WEEK 7
HELLO👋 WELCOME back to our blog!! So this week we were introduced to a new software called, "Fusion 360". This software will help us to draw and design the different components so that we can visualize better. These drawings can actually be printed out using a 3D printer if needed😲.
PRE-LESSON PREPARTION💨
To get familiarized to the software we were given a task to make a keyring 🔑using this software before our actual lesson. We all had our own difficulties at first but after a while of getting used to the components, we could easily find the components during the actual online lesson.💻 Take a look at our own customized keyrings that all of us did individually. 😄👇
Figure 1 : Kalyani's keyring
Figure 2 : Jolyn's keyring
Figure 3 : Madelaine's keyring
Figure 4 : Cui Han's keyring
ACTIVITY 1😬
We were tasked to sketch constraints during lesson with the aid of our lecturer. It was more difficult than the keyring as it involved sketching more shapes other than just one shape. All of us tried our best and in the end we all managed to do the constraints properly. All of us easily picked up all the basic skills and used it on this activity. TAKE A LOOK AT THE FINAL PRODUCT.👇👇
Figure 5 : Final product of the constraint
FINAL ACTIVITY⏳
After learning all the skills from this 2 activities we were tasked to design a photo frame using this software, Fusion 360. We needed to make a photo frame to fit a 4R photograph📷. We did take some time to finalize our dimensions for our photo frame. Take a look at our final dimensions.👇Figure 6: Dimensions of our photo frame📏
After getting our dimensions📏, we all distributed the roles on the different parts of the photo frame. Now lets take a look at the design of the different parts, using Fusion 360💻.
Figure 7 : Different parts of the photo frame using Fusion 360
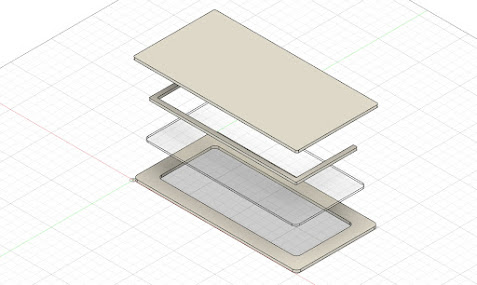
And finally we stacked up the different parts of the photo frame. Take a look at how it looks like below👇👇.
Figure 8: Stacked up the different parts of the photo frame
After stacking up and layering the different parts, the final product is shown below, so take a look👇😊!!


Your final activity was described with details, including the dimensions used. Well done!
ReplyDelete